Sunday, September 19, 2010

Zebra print cake

So here is my latest cake. I made this for a little girl turning 13. She wanted it to be a square cake on bottom that was white with blue zebra stripes and a round cake on top. She also wanted music notes and the number 13 somewhere on the cake and the rest was up to me. So here is what I came up with. I don't know if you can tell by the picture but those are black feathers behind the number 13.
I made the 13 by rolling out some blue fondant into 2 long skinny sausages (or snakes) and then shaped them into a 1 and a 3. Then I inserted a toothpick into the bottoms of both and let them lay on a piece of cardboard covered in waxed paper for a few days to dry. For the zebra stripes I just rolled out some blue fondant with my rolling pin and then used a knife to cut out pieces that I thought resembled zebra stripes. Both cakes are frosted in buttercream. I usually cover in fondant for a smoother finish but the cake recipient isn't a big fan of the fondant taste (most people aren't) so I just iced this cake in buttercream and tried my best to make it as smooth as possible. And you know what? I think I did a pretty good job!
I took some pictures of my process of making the bows and have included a little tutorial on how to do them.

Here are some of my fondant tools. I didn't end up using any of the little green tools but I had them out just in case I needed them. I used the fondant smoother (the U shaped white thing) to roll out the sausages for the 13. If you just used you hands to roll out sausages you usually end up with a bumpy uneven sausages (caused by the spaces in between your fingers).
I buy white fondant and then color it myself. I know some people prefer to make there own fondant but I have found that even if I make the fondant myself nobody eats it so why not save myself the trouble and buy pre-made?
Here is the food coloring that I use. It's Wilton paste color and it can be found at Walmart or most craft stores. If you try to used liquid food coloring it will cause you fondant to become sticky.
You just add little amounts of food coloring at a time to your fondant and then knead it in until you get the desired color.


                                                             This can be a messy process.
And this is what you fondant looks like all colored.

Be sure to wrap the fondant you are not working with in Saran wrap, it drys out very quickly!
Now take your rolling pin and roll out a piece of your fondant flat. Then either take a knife, a fondant cutter/embosser or if you are like me and cant cut a straight line to save your life a ribbon cutter and cut yourself  a strip of fondant.


Now cut then ends of so they are straight.
Then what I did what cut the strip into 2 equal lengths then moisten one edge of the strip with my paint brush dipped into a little bit of water and then fold one end over so both ends are touching (one end on top of the other) so you have a loop. Then scrunch the ends a little so it looks my natural (like a real bow). Then I take a little piece of saran wrap and scrunch into a ball and stuff it into each loop and leave it in there for a few days until the bow is dry. This way it will look like a bow and not some flat folded thing. Then I wet the top end of one of my loops and then take my other loop a place it on top of the first loop and kind of "smoosh" them together. *After I made this bow I was watching and episode of 'Amazing Wedding Cakes' and they made a bow and their way seemed a little simpler than mine. Instead of making 2 strips just take one long strip and fold then ends of to meet in the middle to make your 2 loops. Then just pinch the middle together. It ends up looking the same as mine but you don't have 2 pieces that you have to worry about sticking together. I think I will try this next time I am making bows!

Then you take another small strip and fold the ends of it to make it look more natural and then wet the ends and then wrap it around the middle of your bow making sure the ends meet in the back.

Now I made the bow ends (I don't know the correct term for them) but I did not end up using them on this cake. The way you make them is to cut a "V" shape out of one end of your fondant strip. Then to make them look kind of wavy and more realistic looking I just scrunched them a bit so that they looked liked they had ripples in them and then left them like that to dry.
And that's it! You let them sit for a few days to dry and then they are ready to place of your cake.

Saturday, September 4, 2010

Lady Bug Friends Cake

My sister-in-law was having a "Lady Bug Friends" (party supplies for this theme can be found at celebrateexpress.com) birthday for my niece Madison's first birthday and I was asked to make the cake. So here it is. I made the big cake for everyone at the party to eat and the little one was Madison's very own "smash cake". The main cake was a french vanilla cake with cinnamon buttercream and the "smash cake" was a chocolate fudge cake with vanilla buttercream. For my cakes I usually like to start with a box cake mix and then add my own ingredients to "doctor it up". I will include the recipes I used below.

The main cake is covered in fondant with fondant accents. To make the lady bug I baked a cake in half of the Wilton Sports ball pan. For the lady bug's face I used a medium sized round cookie cutter and cut one circle out of peach colored fondant and one out of black fondant. Then I took the black circle and cut the top off in the shape of the top of the lady bugs head (see picture below) and the attached it to the peach circle with a little bit of water. Then for the antennae I rolled out a thin sausage with the black fondant and cut two pieces for each antenna. Then I sculpted 2 little black hearts and attached those to the antennae with some water and then attached the antennae to the lady bugs head. I did all this about a week before the party so that the head had time to dry. Then when it came time to put the cake together I just attached the head to the body with a little glob of buttercream.
Here is a cute shot of the ladybugs but.


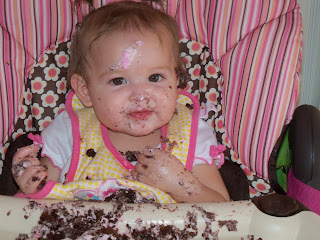
And here is the "smash cake". For those of you who have never heard of a smash cake before her is the definition. Smash Cake n. a celebratory cake intended to be destroyed, especially by a child. Smash cakes are usually made for a child's first birthday so they have their very own cake to eat and make a mess with. I covered the smash cake all in buttercream NO Fondant (I don't think fondant would be very easy for a little one to eat). The smallest sized cake pan I have is a 6in. round which I thought was still a little too big so what I did was make a larger cake and then take my largest round cookie cutter (about 4in. in diameter) and marked to circles on the larger cake. Then I cut them out and stacked them together and then I had the perfect sized cake for Madison.


Here we are singing happy birthday...


And here is the birthday girl digging into her cake.


YUM!


And here she is all done ready for mommy to clean her up. :)
Doctored Chocolate Fudge Cake:
Preheat oven to 350 degrees
1 box of Chocolate Fudge cake mix
1 cup all-purpose flour
1 cup granulated sugar
1 box of instant chocolate fudge pudding mix
3/4 tsp salt
3 eggs
1 & 1/3 cup of water
2 TBSP vegetable oil
1 cup sour cream
2 tsp vanilla extract
Mix all dry ingredients by hand using a whisk or a fork (I use one of my beaters from my mixer) in a large mixing bowl. When all dry ingredients are well mixed add in the rest of the ingredients and beat at low speed for 30 seconds (until it all looks wet) and then at medium speed for 2 minutes.
Pour into greased and floured pans and bake until done (when toothpick inserted into center of cake comes out clean). Sorry I don't have an exact time, I just set my timer for 20 minutes and then start checking it until it's done after the first 20 minutes. Baking times vary depending on the size of you pans.

Doctored French vanilla cake :
Same recipe as above except use French vanilla cake mix and vanilla instant pudding mix. The recipe above can be altered for any flavor of cake you are making. If you are making a white cake use 4 egg whites instead of 3 whole eggs.
Vanilla Buttercream:
1 cup of solid white vegetable shortening
1 cup of salted butter
2 tsp of vanilla extract
*2 -6 TBSP of milk or water (start with 2 and then add more if needed)
2 lbs. confectioners (powdered) sugar (8 cups)
2 TBSP Wilton meringue powder (can be purchased at Walmart or most craft stores)
A pinch of salt
Cream butter and shortening with mixer then add water or milk and vanilla; mix until blended. Add dry ingredients, I add about 2 cups of sugar at a time and blend after each addition. Blend ingredients until they are all combined and frosting is creamy. If frosting is too thick add in some more milk or water until frosting is the consistency you want it.
Cinnamon Buttercream:

Use the vanilla buttercream recipe and then add 2 tsp ground cinnamon to it.