
The Party Games:
Pin the tail on Pikachu
For this game I did some searching online for pictures of Pikachu. I found this one of him standing with his backside facing you and him looking over his shoulder and I thought it was perfect for "Pin the tail on Pikachu". So I drew the image on to a poster board and then painted it. Then I painted the tail white so the kids would know where to put the tails but make it look like his tail was missing.

Here's a couple pictures of the kids playing.


Spoink Race ( sorry about the wrinkled state of my posters but I forgot to take pictures of them until the day after the party)
For the Spoink Race game the kids were divided into two groups. They were supposed to take a pink balloon and rub it on their heads (to work up a static cling) and then race over to a big bucket with the balloon on their head (using no hands to hold the balloon). Once they got to the bucket they would take the balloon off of their heads and put it in the bucket and then run back to their team and then the next person would go. This didn't work out so well for the boys. Because of their short hair they couldn't get any static cling, sooo.... we just ended up having the kids putting the balloons in between their knees and walking over to the buckets (sorry I didn't get any pictures of the kids playing this game).

Pokeball Hunt

Pokeball Hunt
For this game I bought a bunch of ping pong balls on ebay and then used a red and black sharpie to color them to look like pokeballs. Then I hid them all over the house (think Easter egg hunt) and had the kids find them. Whoever found the most pokeballs won a prize.

Here are my ping pong pokeball masterpieces. :)


Here are the kids trying to pop the balloons.

Pokemon Bingo

Here are my ping pong pokeball masterpieces. :)

Pikachu Stomp
I found these Pokemon tattoos at Oriental Trading Co. It was like less than $5 for 72 tattoos. So I filled a bunch of balloons with air and put one tattoo in each balloon. I made sure that I only used one pikachu tattoo. Then I had the kids stomp on the balloons to pop them. Whoever popped the balloon with the pikachu tattoo inside of it won a prize. This game was cool because even if you didn't win you still got to keep the pokemon tattoos that were in the balloons.

Here are the kids trying to pop the balloons.

Pokemon Bingo
Another game that I did was Pokemon Bingo. Sorry I didn't get any pictures. I was too busy being Bingo caller. But anyways I found these printable Pokemon Bingo cards online at http://www.dltk-cards.com/bingo/bingo1.asp

and this... (turtwig)

and this... (squirtle)

and this! (chimchar)

I drew and painted these. The pokemon characters were painted on cardboard and the birthday sign, pokeballs and lightning bolts were painted on big sheets of paper.


Goody Bags
The Party Decor:
My awesome hubby helped me with the decorations.
He painted these... (piplup & charazard)
He painted these... (piplup & charazard)

and this... (turtwig)

and this... (squirtle)

and this! (chimchar)

I drew and painted these. The pokemon characters were painted on cardboard and the birthday sign, pokeballs and lightning bolts were painted on big sheets of paper.


Goody Bags
I bought white lunch bags and then printed out coloring pages of my son's favorite pokemon characters. I cut out the coloring pages and glued them to the bags before the party. Then the kids got to pick a bag and color it at the party. This served as another party activity for the kids and then when they were done coloring they got to use them for their goody bags.

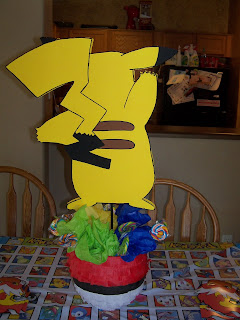
This is the Pikachu table centerpiece that I made. I painted Pikachu onto a piece of foambaord and then cut him out. Then I painted a wooden dowel black and stuck it into the bottom of Pikachu. For the base I paper mache'd a ball shape, cut the top off and then decorated it to look like a pokeball. Then I put styrofoam inside the pokeball and pushed the wooden dowel into the styrofoam. Then to cover up the styrofoam I stuck colored tissue paper in the pokeball. I had bought these swirly lolipops at Oriental Trading Co. for Adam's party and decided they would look cute sticking out of the centerpiece. So I just stuck the lolipops in the styrofoam too. And voila! there he is!

And here's the back.
Guess how many Caterpie?

This is the Pikachu table centerpiece that I made. I painted Pikachu onto a piece of foambaord and then cut him out. Then I painted a wooden dowel black and stuck it into the bottom of Pikachu. For the base I paper mache'd a ball shape, cut the top off and then decorated it to look like a pokeball. Then I put styrofoam inside the pokeball and pushed the wooden dowel into the styrofoam. Then to cover up the styrofoam I stuck colored tissue paper in the pokeball. I had bought these swirly lolipops at Oriental Trading Co. for Adam's party and decided they would look cute sticking out of the centerpiece. So I just stuck the lolipops in the styrofoam too. And voila! there he is!

And here's the back.

Guess how many Caterpie?
There is this pokemon called a Caterpie that looks kinda like a worm. So I bought this little glass jar, filled it with gummy worms and printed out a little "guess how many caterpie" sign for it. Then I placed a little bowl next to it and little sheets next to it. I had everyone write their names and how many caterpie they thought were in the jar on the paper fold it up and put it in the bowl. Whoever had the closest guess to the actual amount got to keep the jar with the caterpie in it.

Pikachu Pinata:

Pikachu Pinata:
I paper mache'd 2 balloons, cut the bottoms off and then paper mache'd them together. Then I added some ears, arms, feet & a tail. Then I decorated it with tissue paper and printed out a face and glued it on a Taa Daa! You have yourself a Pikachu pinata.


